Showing posts with label DIY. Show all posts
Monday, December 5, 2011
A story of a chair...
I was given this chair this summer when a friend moved to another state...
It is not my style in color but OH MY is it comfortable!!! So it sat used
everyday in the living room...but that color...I just knew I needed to do
something.......
1st Attempt:
I thought first to recover it but then thought that would take forever!!
So, I planned on doing the Paint the fabric treatment... found some Fabric
paint that says it will stay Soft (it was called Soft Fabric Paint) and
tried that (it took 3 containers and the pink was still showing through)
on one side of the seat cushion. It also took overnight to dry and was NOT
soft!!!!!!!!!!!!!!
2nd Attempt:
So, tried a spray fabric paint which was $4 a can (with a 40% off coupon)
and after using the whole can on one side of the seat cushion, it was Soft
but you couldn't even tell I painted!!!!
3rd Attempt:
Decided maybe recovering it with fabric wouldn't be too hard and in 2 hours
I had it recovered and done!!! (with fabric I had on hand!! so FREE) Should
of just done that to begin with!!
I am going to get some buttons and put that through the seat back..but I think
it looks a ton better and I did rip off the skirt on the bottom of the chair..
I am thinking this summer of painting it white...What do you think? Leave it or paint??
~Fawn
BEFORE:
AFTER:
Labels:
Before and After,
DIY
Thursday, February 3, 2011
Curtains


I love polka dot in red!!! So, I found some fabric on sale at JoAnn's the other day and was trying to figure out what to use it with. I know I wanted to use it for a ruffle on the rest of the dining chair slipcovers, but I don't have the drop cloth fabric for that yet. So, I saw our curtains and thought it would be perfect to add a little layer of polka dots!! I cut the fabric about 8 inches then hemmed the ends and the bottom hem then just attached it to the gingham ribbon above the cherry layer. I think it turned out adorable and adds a little customization to stock curtain panels in our dining room/kitchen.
Friday, January 28, 2011
A Quilt and Cupcakes...
Well, I have been up to a couple things....I made our new baby boy (soon to arrive in 18 days) a John Deere Quilt/Blanket. I had purchased the quilt front a couple months ago and the back fabric, but didn't buy any batting so needless to say it was quite some time ie. 2-3 months til I got back to the store to pick up some batting, which was perfect timing as it was on sale for 50% off :) So at nap time yesterday I quickly sewed the quilt together and it is now resting on the crib waiting to meet its owner... I also had just enough fabric to also sew a case for the changing table pad to match, which is actually going to be our boy's bed in our bed....a good friend of ours told us about using their changing table pad as a bed on their bed for the first couple months then move it into the crib and it was a MUCH easier transition....We love that idea as it has always been a battle with our kids when we move them from our bed to the crib...


Also, I found a recipe for Boston Cream Cupcakes from the Beat until Fluffy blog and since my hubby LOVES boston cream cake, thought this would be a nice treat! :)

MY VERSION is basically the same EXCEPT I did not make the filling, I just used a package of vanilla pudding and put in 2 cups of milk vs. 3 to make it thicker and used 1 1/2 teas. of vanilla extract. I also did not use superfine sugar in the batter and in the chocolate glaze I did use whole milk instead of heavy cream and agave syrup instead of corn syrup.
If you want her recipe just click on the Beat until Fluffy blog/recipe link above and it will direct you to her website recipe!!
~Fawn


Also, I found a recipe for Boston Cream Cupcakes from the Beat until Fluffy blog and since my hubby LOVES boston cream cake, thought this would be a nice treat! :)

MY VERSION is basically the same EXCEPT I did not make the filling, I just used a package of vanilla pudding and put in 2 cups of milk vs. 3 to make it thicker and used 1 1/2 teas. of vanilla extract. I also did not use superfine sugar in the batter and in the chocolate glaze I did use whole milk instead of heavy cream and agave syrup instead of corn syrup.
If you want her recipe just click on the Beat until Fluffy blog/recipe link above and it will direct you to her website recipe!!
~Fawn
Thursday, January 13, 2011
Getting Close...
Ok, so I haven't posted anything this year yet, so thought I would say a quick
not to what is going on...
1. Have 4 weeks left before baby #4 makes his appearance so am getting more and more uncomfortable by the day...
2. We have done some more on the upstairs bathroom, we have put some tiles on the stairs (the peel and stick variety)
3. ok...I guess that is it :)
We are back in the swing of school time (I currently homeschool our 1st grader and pre-schooler) so that is consuming alot of the time, when I have energy to work on the house...other than just trying to keep up with laundry and dishes and the cleaning :)
Hopefully, we will completely finsh the upstairs bath and get the shower dowstairs working before the 4 week deadline!! I am really hoping so!! Even have a good friend telling my hubby that he will help him install the kitchen cabinets...that sure would be nice to have that done too..but honestly I doubt that will happen :)
Well, hopefully in the next couple weeks I will have some finished pics of our bathrooms!!
Enjoy your January 2011!
~Fawn
not to what is going on...
1. Have 4 weeks left before baby #4 makes his appearance so am getting more and more uncomfortable by the day...
2. We have done some more on the upstairs bathroom, we have put some tiles on the stairs (the peel and stick variety)
3. ok...I guess that is it :)
We are back in the swing of school time (I currently homeschool our 1st grader and pre-schooler) so that is consuming alot of the time, when I have energy to work on the house...other than just trying to keep up with laundry and dishes and the cleaning :)
Hopefully, we will completely finsh the upstairs bath and get the shower dowstairs working before the 4 week deadline!! I am really hoping so!! Even have a good friend telling my hubby that he will help him install the kitchen cabinets...that sure would be nice to have that done too..but honestly I doubt that will happen :)
Well, hopefully in the next couple weeks I will have some finished pics of our bathrooms!!
Enjoy your January 2011!
~Fawn
Friday, November 19, 2010
DIY Dining Chair Slipcover
After:

Before:

Ok, I tried my hand at making a Dining Chair Slipcover! I have never tried making one or any type of slipcover so I was extremely intimidated by it. BUT Ana White from Knock off Wood Made it seem really easy so I gave it a try...I did NOT make her parson chair but I altered her measurement to fit my dining chair. It is NOT perfect but I am ok with it... I did use a drop cloth for fabric that I prewashed. I have 6 dining chairs without arms and 2 with arms so I have a LOT more to sew but atleast I know I can do it and I did this one all cut and sewed while my girls took their afternoon nap...Pretty happy with that!! :) I did have to do a little altering to the way she sewed it since the back was ending up way too long, but that is most likely my own fault with measurements not hers...Now I get to see if it will hold up to 3 kids and a hubby :)
~Fawn
Cost Breakdown:
Drop Cloth I had for another project but never used it (only used half of it)
Thread already had $0
Chair was FREE was given the dining table and chairs $0
I am linking this up with Remodelaholic.

Before:

Ok, I tried my hand at making a Dining Chair Slipcover! I have never tried making one or any type of slipcover so I was extremely intimidated by it. BUT Ana White from Knock off Wood Made it seem really easy so I gave it a try...I did NOT make her parson chair but I altered her measurement to fit my dining chair. It is NOT perfect but I am ok with it... I did use a drop cloth for fabric that I prewashed. I have 6 dining chairs without arms and 2 with arms so I have a LOT more to sew but atleast I know I can do it and I did this one all cut and sewed while my girls took their afternoon nap...Pretty happy with that!! :) I did have to do a little altering to the way she sewed it since the back was ending up way too long, but that is most likely my own fault with measurements not hers...Now I get to see if it will hold up to 3 kids and a hubby :)
~Fawn
Cost Breakdown:
Drop Cloth I had for another project but never used it (only used half of it)
Thread already had $0
Chair was FREE was given the dining table and chairs $0
I am linking this up with Remodelaholic.
Labels:
Before and After,
DIY
Saturday, October 23, 2010
A dresser reborn.....
Before:


This is the dresser I have been saying I would post.... It involved sanding, priming, painting, distressing, polyurethane spray and new knobs.....
Cost breakdown:
Dresser $10
Paint/Primer FREE stuff I had laying around
New Knobs .89 x 8 $7.12
Can of Polyurethane Spray $4.00
Total Cost: $21.12
What do you think?
~Fawn


This is the dresser I have been saying I would post.... It involved sanding, priming, painting, distressing, polyurethane spray and new knobs.....
Cost breakdown:
Dresser $10
Paint/Primer FREE stuff I had laying around
New Knobs .89 x 8 $7.12
Can of Polyurethane Spray $4.00
Total Cost: $21.12
What do you think?
~Fawn
Labels:
Before and After,
DIY
Monday, August 16, 2010
3 monkeys in a room


Ok, so I really don't have "literally" 3 monkeys but I do have all 3 kids right now in one room!! Thank God it is a big room with 2 closets (1 is for their clothes, the other is a walk-in called "reading room" though I don't know how much reading goes on in there.. mainly playing...) It is actually working, they go to sleep at night and the girls will take a nap at naptime. They all love sharing a room, yes they are 6 and under but hopefully they will enjoy this for a few more years until our oldest is ready to move downstairs to his own room...
I am linking this up with Cottage Instincts.
Labels:
Decorating,
DIY
Thursday, May 13, 2010
JJ's Headboard and bathroom part 1
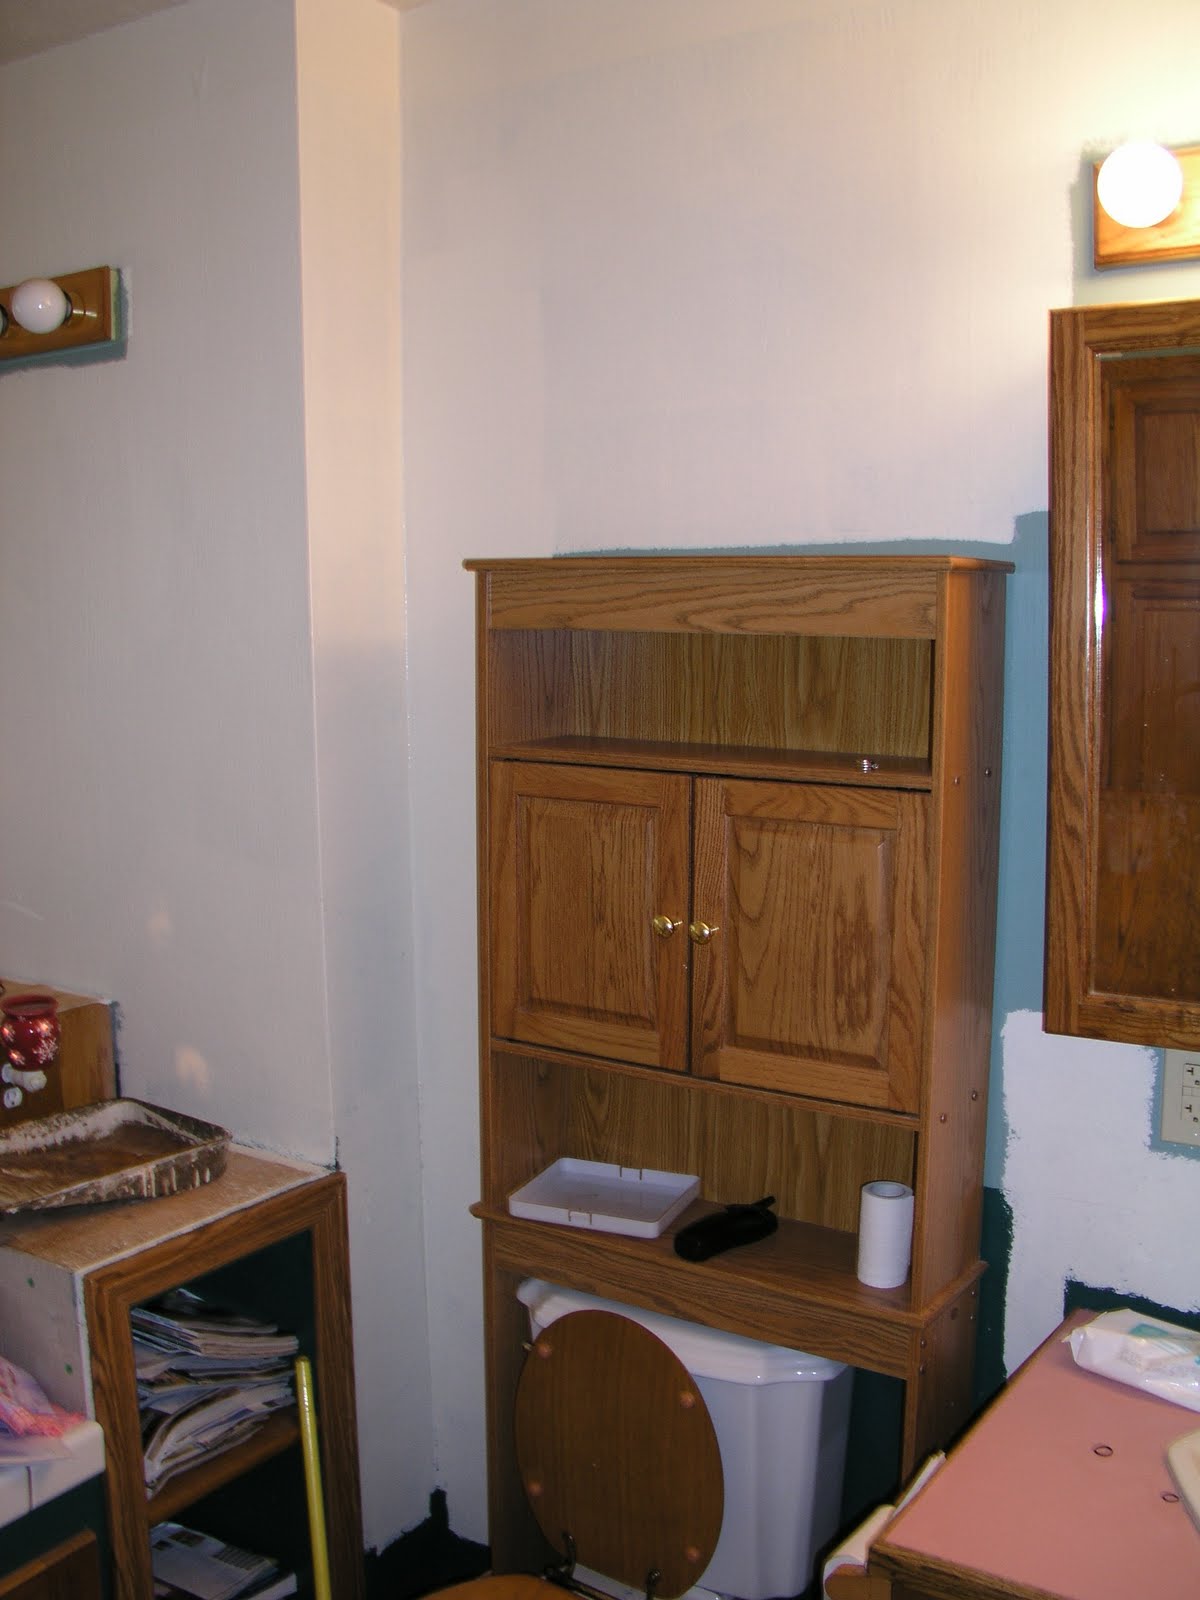
This is part of the bathroom after 1 coat of cream paint (the previous homeowner left us a 5 gallon bucket of this)......we still plan on
1. Change lights out
2. Remove the ugly oak toilet thing and put a white storage thing there
3. Sand and paint all trim a bright White
4. Finish tiling around the tub...

This is the BEFORE!!! Notice Pink Ceiling..Floral Wallpaper...Green and Dark Green Textured walls...hollywood lights....oak....oak and more oak...

This is JJ's Bed with the new headboard up and his full bed..We still have to put his bed on risers
so it will fill in the gap between the bed and headboard.....

He likes it :)
~Fawn
1. Change lights out
2. Remove the ugly oak toilet thing and put a white storage thing there
3. Sand and paint all trim a bright White
4. Finish tiling around the tub...

This is the BEFORE!!! Notice Pink Ceiling..Floral Wallpaper...Green and Dark Green Textured walls...hollywood lights....oak....oak and more oak...

This is JJ's Bed with the new headboard up and his full bed..We still have to put his bed on risers
so it will fill in the gap between the bed and headboard.....

He likes it :)
~Fawn
Labels:
Decorating,
DIY,
Projects
Wednesday, May 12, 2010
Kids Bedroom..Joy's bed....Take 2
Here is the AFTER of Joyelles side of the room with JJ's old twin bed that I put some watered down black latex paint over to darken it and make more chocolate brown...some pink Uppercase Living polka dots.....and some strawberry shortcake sheets with her PB quilt.....I am going to redo her canopy with a crown (found off etsy) with more polka dots and I have moved her name to the end of her bed.....

Another shot..you can see her old bed (toddler/crib that is now moved to Savannah) in
the background....

Here is the BEFORE!! ( this is before I rubbed on the black watered down black latex paint)

She loves it and that is what matters most!!!
I am also working on JJ's full bed...made half of the headboard today and hopefully will finish it tomorrow....
~Fawn

Another shot..you can see her old bed (toddler/crib that is now moved to Savannah) in
the background....

Here is the BEFORE!! ( this is before I rubbed on the black watered down black latex paint)

She loves it and that is what matters most!!!
I am also working on JJ's full bed...made half of the headboard today and hopefully will finish it tomorrow....
~Fawn
Labels:
Decorating,
DIY,
Projects
Sunday, May 9, 2010
Kitchen Part 2
Please note: This Kitchen is FAR from a show stopper.. It is just some minor fixing before I have to do a major kitchen remodel....mainly to make things atleast a little more presentable!! :)
This is the shelf.....with some things added..

This is the corner of the kitchen on one of my 3 different types of countertop (this being a sheet of lineolum) and some freshly baked cinnamon rolls cooling :)

A closer look at the stripe...

This is the shelf.....with some things added..

This is the corner of the kitchen on one of my 3 different types of countertop (this being a sheet of lineolum) and some freshly baked cinnamon rolls cooling :)

A closer look at the stripe...

Well, I finished up the stripe in the kitchen and then decided I need to stick up a shelf above the sink.... there was a shelf when we bought the house, BUT it wasn't actually attached so when my little boy reached up to grab a cup...it all came tumbling down....so needless to say I actually screwed this one to the wall and to the shelf!!!
No, it is not perfect, but neither am I so I think it is just right :)
~Fawn
PS. We are now also doing a minor remodel in the bathroom so I will update you on that too...bathroom half painted...exhaust fan ready for a facelift...and new lights picked out..
new vanity top and faucets picked out....nothing bought but all in the works.....
Labels:
Decorating,
DIY,
Projects
Wednesday, May 5, 2010
Kitchen....Part 1
This is The AFTER!!

The stripes are in...silver on top and black on the bottom and red paint inbetween..
Silver is 1/4 in. and black is 1/2 in.

This is the red stripe I painted....see my lines... not so pretty :)

This is the BEFORE!! (yes in the after I did move the cabinet and shelves closer to the wall-part 2 will show why :) )

The stripes are in...silver on top and black on the bottom and red paint inbetween..
Silver is 1/4 in. and black is 1/2 in.

This is the red stripe I painted....see my lines... not so pretty :)

This is the BEFORE!! (yes in the after I did move the cabinet and shelves closer to the wall-part 2 will show why :) )
Labels:
Before and After,
DIY
Subscribe to:
Posts (Atom)